Posts

Showing posts from 2011

Modfiy Premade Blender Skeletal Mesh & Export to UDK.

Image
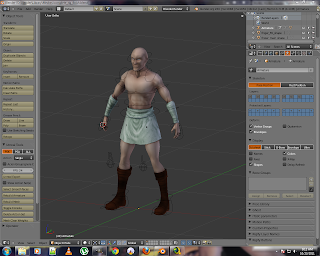
Today, I'll modify a ready made skeletal mesh , rigged with Riggify for export to udk. Basic Model & Rig were made by Lee Salvemini ( Sintel & Elephants Dream ) in a very detailed rigging tutorial hosted here . I'll be using Blender 2.60 with Darknet's Psk/Psa exporter version 2.3. I strongly recommend you all to step by step work with Lee's tutorial, to grasp the rigging concepts of Blender. It helped me a lot. For impatient, please download the file. http://cgmasters.net/blenderguru/complete_rig_finish.blend Mesh & Armature used in tutorial are not my property and are not usable in commercial application or usage. I am using them just for educational purpose. If you like to use them in your project, please contact the original owners. Ok, Lets get started. Start Blender & Load "comlete_rig_finish.blend". complete_rig_finish.blend Go to Object Data Tab -> Display Options and uncheck Shape and check X-

Blender Low Poly Window Texturing & Unwrap

Image
OK, in our previous tutorial , we made a low poly mesh of window. in this tutorial, we will texture & export it for usage in UDK. So, fire up your blender and load the saved file. 1.    First select the Window Top Inset Panel ( I call it glass). 2.    In Material panel, select a new material by pressing New button & name it Glass. 3.    Give it any color by choosing it from diffuse panel. 4.    Press Ctrl+I to inverse your selection (Make sure, your mouse cursor is in 3dWindow. 5.    Now, Create one more material and name it wall. and choose a color to your liking. 6.    Press Assign button to assign the selected material to the walls of the window. 7.    now, your mesh has 2 different materials, which will come handy in UDK later on. All Materials Added 8.    Lets unwrap our mesh, so that we can put some textures on it. 9.    Arrange your window changing your time line window to UV Image Editor. Windows Arranged for UV Wrapping

Blender Low Poly Window

Image
In this tutorial, I'll create a simple mesh, using blender 2.8 for UDK. i am planing to use this window mesh in ProcBuild option of UDK. I've tried my best to give the instructions step by step, but mistakes happen. OK,  let's go to tutorial 1. Start Blender (I have 2.58 Installed) 2. Delete the default cube 3. Select Front View by Pressing 1 on Keyboard. Then Orthographic view by pressing 5. Orthographic View 4.  Add a Plane (Press = Shift + A > Select Plane. 5.  Align the Plane to View (Tools Panel > Align to View Check box). 6.  Scale Plane on X Axis by 4 Blender Units ( Press = S > X > 4 ). 7.  Scale Plane on Z Axis by 8 Blender Units (Press = S > Z > 8). 8.  Press Shift+C on keyboard to align your 3dCurson in the middle of the canvas. 9.  Press G and move your plain by holding the Ctrl key so that it only move by a blender unit. Make sure that your plane is exactly aligned as shown in the pic. Origin @ 3d Cursor

How to Setup WOTgreal

Image
Hi, Today, I'll help you out in installing and setup WOTgreal , an editor for unreal scripting. It comes with Intellisense ( a feature made popular by Microsoft Visual Studio), which really helps in faster and better coding. I am not saying, it is the only editor solution out their, but it is one of the most convenient after Notepad++. First of all, download WOTgreal from here , along with  WOTgreal development kit. We need the development kit to enable some of the features, which are not available with installer package. Install the WOTgreal with defaults. Do not start the program yet. Unzip the development kit and copy all of the files in main WOTgreal installation folder. Now, start the WOTgreal and wait for it to load the initial start setup. Setup Wizard :  press next. Configure Game Type: Do not select anything and press next. Configure Look & Feel : choose Keyboard settings, Highlighter settings  & Skins. I usually leave it as it is. Class / Pack

Unreal Development Kit

Hello Everyone! I have downloaded the latest release of UDK (Unreal Development Kit) a couple of week back and instantly got caught by the power it hand overs to a simple user like me. It is the same Game Editor, which is used to create AAA titles like Mass Effect, Bioshock & Gears of War , and EPIC has given it to simple modders and gamers like me. You can download a copy from the following link, http://www.udk.com/download.html Documentation is available at , http://udn.epicgames.com/Three/DevelopmentKitHome.html I have started this blog to let you know about the progress i have made with this tool and how to make it. See you soon!