Blender Low Poly Window Texturing & Unwrap
OK, in our previous tutorial, we made a low poly mesh of window. in this tutorial, we will texture & export it for usage in UDK.
So, fire up your blender and load the saved file.
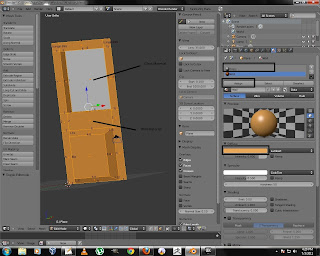
1. First select the Window Top Inset Panel ( I call it glass).
2. In Material panel, select a new material by pressing New button & name it Glass.
3. Give it any color by choosing it from diffuse panel.
4. Press Ctrl+I to inverse your selection (Make sure, your mouse cursor is in 3dWindow.
5. Now, Create one more material and name it wall. and choose a color to your liking.
6. Press Assign button to assign the selected material to the walls of the window.
7. now, your mesh has 2 different materials, which will come handy in UDK later on.
8. Lets unwrap our mesh, so that we can put some textures on it.
9. Arrange your window changing your time line window to UV Image Editor.
10. Press A to select all the vertices/faces and press U to show Unwrap menu.
11. Immediately, your whole mesh is unwrapped below in UV image editor window.
12. Its very ugly, lets change it a bit. Deselect All, and Just select the Glass Face & Unwrap it. Better.
13. Press S to scale it a little bit , so that we have a room for other parts of the window too.
14. Now Press Ctrl+I to inverse the selection and Unwrap. Your remaining parts unwrap. Scale them down, and move around a bit & select all the faces.
15. You can easily align the vertices of your walls by select them press W > Align X or Align Y.It helps in texturing.
15. Lets Start Texturing our Window.
16. In UV Image Editor, Select menu UV's > Export UV layout.
17. Choose 1024 x 1024 as size and export as png. Name the file what every you want it to be.
18. Start your favorite image editing program and load the UV layout file in it. I'll be using Gimp.
19. Open 2 textures , 1 for bricks, other one for a window as Layers in Gimp.
20. Put up the textures as shown above and save the UV layout file. Don't forget to remove the layout from the final image.
21. Now Delete Glass material and select wall material in properties panel.
22. Go to Textures > Add New Texture . Select Type as Image or Video.
23. Load up your UV layout file. Select mapping and for coordinates choose UV.
24. Press F12 to view your window in Render mode.
25. Your window is ready to export.
I hope you like this tutorial. Please let me know if there are problems, or if there is a mistake.
So, fire up your blender and load the saved file.
1. First select the Window Top Inset Panel ( I call it glass).
2. In Material panel, select a new material by pressing New button & name it Glass.
3. Give it any color by choosing it from diffuse panel.
4. Press Ctrl+I to inverse your selection (Make sure, your mouse cursor is in 3dWindow.
5. Now, Create one more material and name it wall. and choose a color to your liking.
6. Press Assign button to assign the selected material to the walls of the window.
7. now, your mesh has 2 different materials, which will come handy in UDK later on.
 | ||||
| All Materials Added |
8. Lets unwrap our mesh, so that we can put some textures on it.
9. Arrange your window changing your time line window to UV Image Editor.
 |
| Windows Arranged for UV Wrapping |
10. Press A to select all the vertices/faces and press U to show Unwrap menu.
11. Immediately, your whole mesh is unwrapped below in UV image editor window.
12. Its very ugly, lets change it a bit. Deselect All, and Just select the Glass Face & Unwrap it. Better.
13. Press S to scale it a little bit , so that we have a room for other parts of the window too.
14. Now Press Ctrl+I to inverse the selection and Unwrap. Your remaining parts unwrap. Scale them down, and move around a bit & select all the faces.
15. You can easily align the vertices of your walls by select them press W > Align X or Align Y.It helps in texturing.
 |
| Full Unwrap |
15. Lets Start Texturing our Window.
16. In UV Image Editor, Select menu UV's > Export UV layout.
17. Choose 1024 x 1024 as size and export as png. Name the file what every you want it to be.
18. Start your favorite image editing program and load the UV layout file in it. I'll be using Gimp.
19. Open 2 textures , 1 for bricks, other one for a window as Layers in Gimp.
 |
| UV Layout editing in Gimp |
20. Put up the textures as shown above and save the UV layout file. Don't forget to remove the layout from the final image.
21. Now Delete Glass material and select wall material in properties panel.
22. Go to Textures > Add New Texture . Select Type as Image or Video.
23. Load up your UV layout file. Select mapping and for coordinates choose UV.
24. Press F12 to view your window in Render mode.
25. Your window is ready to export.
 |
| Final Result |
I hope you like this tutorial. Please let me know if there are problems, or if there is a mistake.


this is interesting. Thanks for sharing fabulous information.
ReplyDelete